On Tuesday in the Lab we took a look at a new robot chassis that will be used for upcoming projects. The frame we are converting is a childs ride-on Power Wheels car with 6 volt battery system. The power system will be converted to a 12 volt system with various supplies for Raspberry Pi and Arduino devices.
Make sure you check out all the projects on the MKME website and join us in the Discord chat.
Controlling virtually anything with a simple Wemos D1 mini board (ESP8266) , a relay and an Amazon Echo Dot.
DIY home automation CHEAP using the amazon Alexa voice service and a few parts!
Join us on MKME Discord chat here: https://discord.gg/j9S4Fgv
Remember to subscribe for more videos! https://goo.gl/2qaJ2U
This is a full tutorial on how to use a cheap Wemos D1 Mini wifie board to control anything in your home with the Amazon Alexa enabled Echo Dot device. Using the Arduino IDE (programming environment) you just need to import the Wemos D1 Mini support then follow this video. After complete just hit upload and your devices (lights 1 through 4) will appear in the Amazon Alexa Device manager for control. Its that easy!
Follow my relay video for explanation of how they work and how to hook things up for control such as lights, motors, etc.
For some time now I have been working to lay the groundwork for our own networks and community collaboration tools. One piece of that I had planned was our own TV network for broadcasting our content live 24 hours a day, 7 days a week.
Back in May I set up the MKME Live YouTube channel (separate from the MKME Lab and MKME Media channels). This week I finally had enough funds to purchase the PC hardware needed to get the channel up and broadcasting!
The channel is up and right now is broadcasting all the archives from the MKME Lab YouTube channel. Certain days I will devote to certain topics (today is RC Saturday with all aircraft and drones/FPV videos)
As time goes on I will hopefully have content created by others in the MKME Community. The channel will become a tunnel through which we can all reach the world.
I have many more plans under development. Stay tuned!
I thought it time for a quick update and share some things going on with the YouTube channel and MKME Community lately.
The last few months have been extremely busy. A lot has gone on in the “background” and I’m excited to say that the next few months should bring more updates, announcements, new initiates and video development than any time in the history of the MKME community.
Sometime in late Q3/early Q4 2016 you will see this work start to be published. As always, it will involve all community members as often as possible. I truly love where things are headed thanks to all you amazing people out there. Full details will come as I pass through some of the “gates” required to make my plans a reality.
I have also updated the store with new product lines and a new back end interface to Amazon which should make finding project parts and components easier for those interested. Many times people ask for an Amazon parts source as they do not trust eBay- the MKME store fills that gap.
I’m currently travelling on business in Europe and due to some circumstances beyond my control- two weeks of videos cannot be published. Once I return next week the normal schedule will resume.
Huge thanks to my Patreon supporters who make the MKME Lab videos possible. Thanks to your support I have invested in the full Adobe software suite which will enable me to create higher quality content for the channels. The monthly payment for the Adobe Suite would not be possible without the support of people like you.
This is my full review of my new Outernet Satellite receiving system. A few months back I purchased the Lighthouse receiver system from Outernet to allow me to receive data from satellites anywhere in the world. I am happy to conclude my initial testing and provide a review here.
The Lighthouse receiver hooks up to a satellite dish via standard co-ax cable and is deigned to receive the content provided by Outernet anywhere in the world. You can watch my initial overview and unboxing video here:
I have a large mobile project in mind for this setup so I needed to have a portable dish system for the receiver to interface with. I found a DirectTv foldable/portable dish system which seemed to fit the bill fine. You can find this folding dish here.
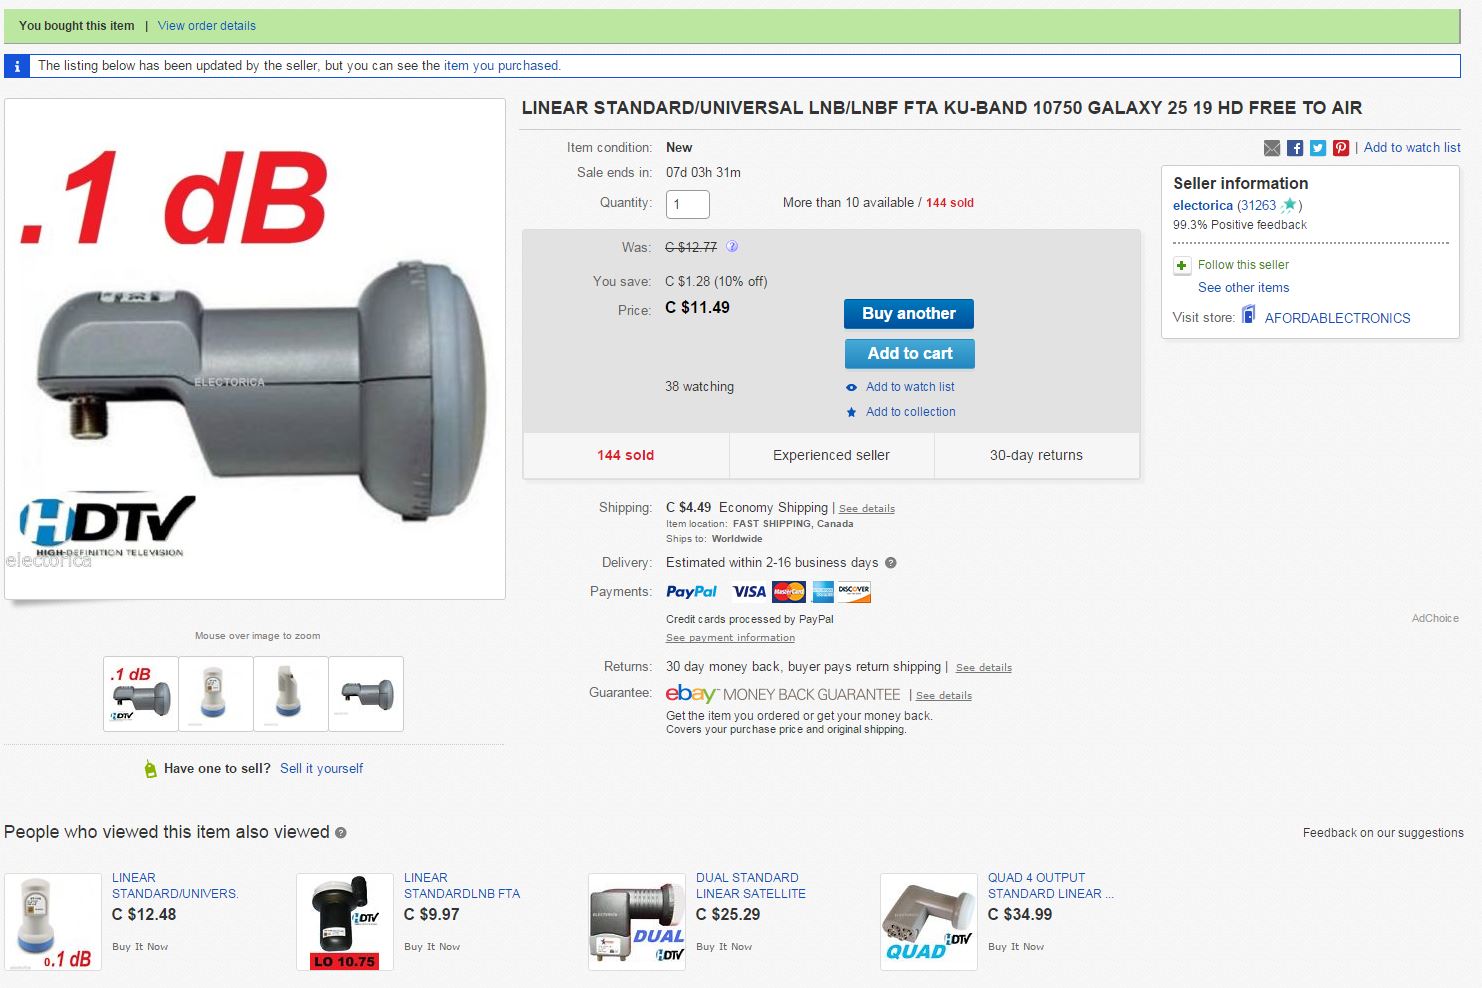
For me to receive the Galaxy 19 satellite here in SW Ontario I knew I would need to swap out the LNB for a KU band unit on the dish. My initial purchase failed miserably and did not work at all on the satellite. It ended up being that the receiver could not switch the LNB over to a linear polarized only receive function so I had to find one which could work by default.
On eBay I found a dedicated KU band Linear LNB for a reasonable price and this turned out to be the key to success.
To install you simply need to measure the distance of the old LNB to the dish face and ensure the new one has the receiving face in the same spot. I did this by measuring the overall distance as well as marking the support arm with a sharpie marker and a t-square. Just remove the clamp and swap for the new one. Most LNBs have the same size barrel- if not- you will need to get a bit more creative.
Important note: This is an offset dish so remember to subtract 10 degrees from the elevation value for your area (this is noted on a sticker on the side of my particular dish but yours might not be)
Once the dish was retrofitted I was then able to receive the data stream Outernet is sending on the Galaxy 19 satellite. The news, educational lessons and even Twitter feed began downloading with no issue.
Here is the FULL review video:
My hope is to use this system in an upcoming “Without Borders” project which I should have mostly finalized by mid 2016 and ready for in-field testing (I hope).
Although the system now works well for me I have to admit it still belongs in the realm of “DIY” type people as you may need to do some tinkering with a dish and setup. If you run into issues (like I did initally) make sure you check out their forum for help.
Here is my forum thread where I worked through the LNB issues initially. It is a good read I think if you are interested in seeing the troubleshooting process etc. Branko on the forum was fantastic to deal with. Amazing support!
The content being sent by Outernet is pretty comprehensive and I have little doubt it will evolve quickly as more people realize this system is an option in areas without easy access to internet/data.
Facebook and Google have plans for several internet systems in remote areas- oddly enough, a suitable “first step system” already exists and works very well…
Some time back I picked up a Pico projector to use in some upcoming projects. I purchased mine from Amazon and it arrived quickly and fully functional.
These tiny LED projectors are a great addition to projects with the Raspberry Pi for the due to the sheer portability. This unit has an internal battery which does seem to last about 80 minutes of continuous use. The screen is not the highest resolution (960 X 540) but for the price it is on par with all other units I researched.
I have almost nothing negative to say about this unit. It would be nice if it was a tad bit brighter but this is always a want for any projector.
I can’t wait to use this in the upcoming “without borders” project where it will serve as a display for both Raspberry Pi and Android cell phones.
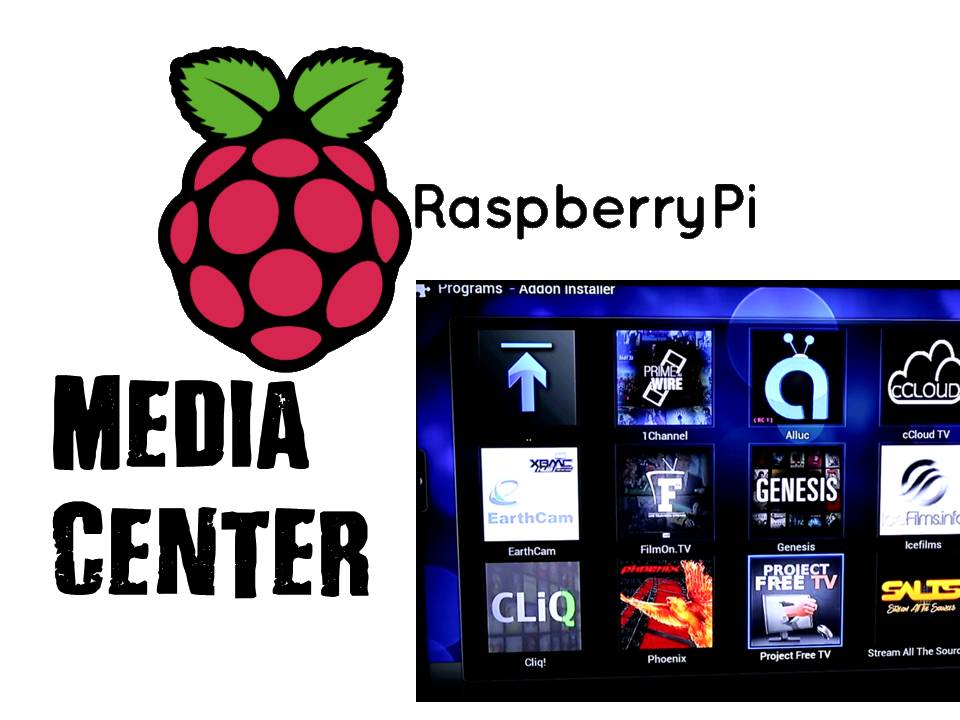
This week we took a Raspberry Pi and set it up as a full media center which can stream videos, watch TV broadcasts and much more.
In order to set up the basic operating system on the Pi you can follow the instructions for OpenElec here:
Once you have your Pi Media center up and running you may want to add more options for streaming movies and TV. To do this you will need to install the Addon Installer by following these instructions:
1. Move to system -> File manager -> Add source
2. Add media location http://fusion.tvaddons.ag and for name add .Fusion
3. Go to settings -> add-ons -> select: install from zip file
4. Select .Fusion
5. Go to start-here and select plugin.program.addoninstaller.zip
6. You get message Addon instaler – Add-on enabled
7. Move to Programs and select Addon installer
8. Select Video Addons
9. Add any Addons you wish such as Genesis etc.
10. Move to videos -> add-ons and there you are, free movies and TV shows on demand